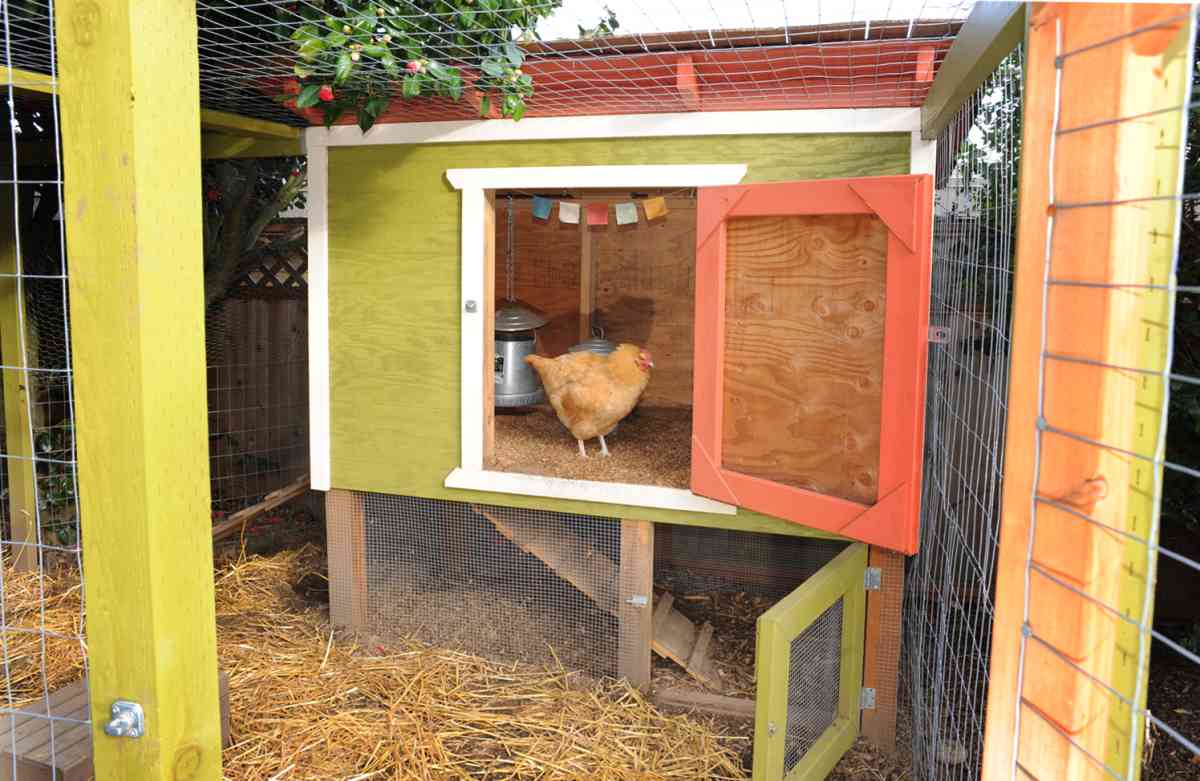
Setting up your first chicken coop in your backyard will help you stir up a mixture of emotions. A little nervous excitement as a beginner and building.
When it comes to housing your flock, it’s definitely rewarding. But there are things to consider, not just pounding some boards together.
It is important to understand exactly what to do inside the shed to ensure your chickens’ happiness, safety and productivity.
These include important factors that need to be considered during the construction of a chicken coop, including good ventilation, roost bars, nesting boxes, chicken bedding, and solid floors.
What do you need inside the chicken coop?

Before diving into essential features, it is important to understand that chicken coops are not just shelters, but rather flock homes, protection and comfort zones.
The powerful and structured shed not only eliminates predators, but also protects the chickens from harsh weather.
Choosing the right location can make all the difference in maintaining a healthy, low maintenance environment in dry, well-drained, partially shaded areas.
1. ventilation
Good ventilation is one of the most important yet often overlooked parts of a chicken coop. Chickens produce amazing amounts of water through their breathing and feces, and if there is no airflow, this water accumulates quickly. Proper ventilation will circulate fresh air while pushing out humidity, ammonia smoke and old air.
Especially in hot or humid climates, ventilation keeps the chickens cool and prevents breathing problems. Even during winter, a well-ventilated coop can reduce condensation and lead to frostbite and mold growth.
If ventilation is good, ammonia from the feces will accumulate, causing the shed to smell strong and unhealthy. High humidity can also cause respiratory problems, mold, and even diseases that spread in an environment with poorly moist ventilation.
Best Practices for Good Ventilation:
A ventilation opening is installed near the roof to allow heat and moisture to escape without creating a direct draft on the roost bird. Use meshes on hardware crosses or vents to eliminate predators and pests while allowing airflow. It offers adjustable vents or windows that can be opened and closed based on the season. Do not seal the shed tightly. Even in winter, air exchange is essential.
2. Roost bar
Chickens do not sleep on the ground – they like to sit high in places they feel safe and secure. That’s where the roost bar comes. These simple wooden bars give your flock a place to rest at night.
It’s not just about comfort. Roast also helps keep your chicken clean and healthy. Sleeping on the floor can cause exposure to feces and water, leading to illness and parasites.
Best Practices for Roost Bars:
Use round wooden bars (such as 2×2 or slightly larger) for a comfortable grip. Provides at least 8-10 inches of space for each chicken on the roost. To discourage you from sleeping in the nest, place the bar under the nest box, 1.5-3 feet away from the ground. Space multiple roosts at various heights with enough headroom to prevent injuries.
3. Nest Box
If you want to clean up beautiful eggs, a nesting box is a must. These cozy little spaces give the chickens a quiet and private place to lay eggs.
A good rule of thumb is one nested box for every 3-4 chickens. Keep the box lined with soft bedding like straw or pine shaved and make sure it is slightly lower than the roost bar so that the chickens don’t try to sleep inside them.
Best Practices for Nest Box:
We offer one nested box for every 3-4 chickens. Place the box in the darkest and quietest corner of the shed. Keep the box about 18 inches away from the ground and under the roost bar. Use clean, dry bedding inside to update weekly to keep your eggs clean. When the hen tries to sleep, it blocks the nest box at night.
Also Read: How to clip a chicken flight wing?
4. Chicken bedding
You may not think much about what will happen on the shed floor, but bedding plays a big role in keeping things clean, dry and smelly. It absorbs moisture from feces and spilled water, helping to control odors and bacteria.
Common options include straws, pine shavings, or fine leaves. Some people go to deep garbage methods that accumulate bedding and compost. It is low maintenance and is ideal for insulation. No matter how you use it, clean and refresh your bedding regularly to keep cooperation healthy.
Best practices for bedding:
It uses dry, absorbent materials such as straw, pine shavings and hemp. Avoid cedar shavings. They can cause respiratory irritation. Spot Clean dirty bedding regularly and completely clean out each month. Consider deep garbage methods for low maintenance and natural composting. Maintains bedding at least 2-4 inches deep for better absorption and comfort.
5. Flooring
Thinking about the floor and skipping may be fascinating, but trust me. That’s important. A solid floor prevents predators like mice and snakes from digging holes, making daily cleaning easier.
Here’s the options. Wooden floors are common, especially when sheds are raised. The dirt floor works, but only requires proper predator prevention and regular maintenance. Some people use linoleum on plywood for easy cleaning. Make sure your floor is level, durable and safe from moisture and pests.
Best Practices for Flooring:
Raise the wooden shed from the ground to prevent rot and discourage pests. Cover the dirt floor with wire mesh below to block predators digging holes. Use a waterproof coating or linoleum on your wooden floor for easy cleaning. Clean and disinfect regularly to prevent feces and bacteria buildup. If the shed is placed directly on the ground, ensure good drainage.
What should we do inside the chicken coop?
In addition to essential needs, there are very few things that should not be inside the shed. What is listed is very important, but can attract predators or lead to mold growth.


1. water
Keeping water inside a shed may seem convenient, but it’s usually not a good idea. Waters can easily lean, leak, and poop in, turning a cozy shed into a damp, smelly mess.
Moisture inside the shed increases the risk of mold, ammonia buildup and frostbite in cold weather. It is much better to run and place the water in a protected area that doesn’t stay clean or soak the bedding.
2. feed
Like water, chicken feeding in sheds often leads to confusion. Chickens damage, scatter, spill feed everywhere, and the remaining crumbs attract rodents and insects overnight.
Additionally, if ventilation is not strong, feed dust is added to the poor air quality. Feeding on a run will make things cleaner and give the bird a little fun during the day.
3. Dust Bath
Chickens absolutely need a dust bath, but not inside the shed. A proper dust bath area takes up space and quickly becomes messy and kicks fine dust bad for your lungs (and yours).
It is best to create a dedicated dust bath zone in a driving or outdoor area with dry dirt, ash, or sand. That way, your shed will stay clean, but the birds can enjoy spa time without turning the bedroom into a dusty sandbox.
What should you consider before installing a chicken coop?
It’s important to pause and plan some important things before you start grabbing and slapping your tool.
A well-thought chicken coop is not simply easy to build. Save stress, money and trouble.
Here are three important factors to consider before setting up your shed:
1. Predator calibration


Wherever you live, in the country, in the suburbs, and even in the city, if you’re not ready, you’ll find chickens. Raccoons, snakes, dogs, and even hawks are always looking for a simple meal.
So before you build it, think about security. The shed requires a solid lock (not just a latch), a strong hardware cloth (no wire mesh!), and a safe floor or buried apron.
It’s easier to withstand predators from the start than fixing something after something breaks.
2. place
The location you choose allows you to create or destroy setups. Choose a flat, well-drained area that exposes the morning sun and afternoon shade.
Avoid lowland spots where water gathers during the rain. Ideally, your shed should be close enough to your home for easy access, especially when you are heading into bad weather to collect eggs or have a quick check-in. Bonus points are if they are near a water source or compost bin.
3. Blood (if you start with a chick)
If you’re starting with a baby chick instead of a mature hen, you’ll need something terrible. It’s because it grows in a warm, safe place before moving into the shed. Don’t rush them too quickly to the main coop. Chicks need extra heat, clean bedding and protection from drafts.
Plan your skin setup in advance and make sure your chicks are completely separate from the outdoor shed until they are at least 6-8 weeks old and fully feathered.
You need to read: 7 ways to break bad chicken
Conclusion
Not only is it to create a proper setup inside the chicken coop, but also to give the flock a safe, healthy and comfortable home.
With proper ventilation, a sturdy roost bar, cozy nesting box, clean bedding and solid flooring, laying the foundations of happy chickens and fresh eggs.
Adding some optional extras, such as concentrated toys and first aid shelves, to avoid common mistakes like keeping water or supplying them inside the shed will make the setup even better.


Computer Science Alumnus Khaja Moinuddin is delighted with gardening and homestead. Join him on this blog as he shares his experiences in homesteading, gardening and composting


