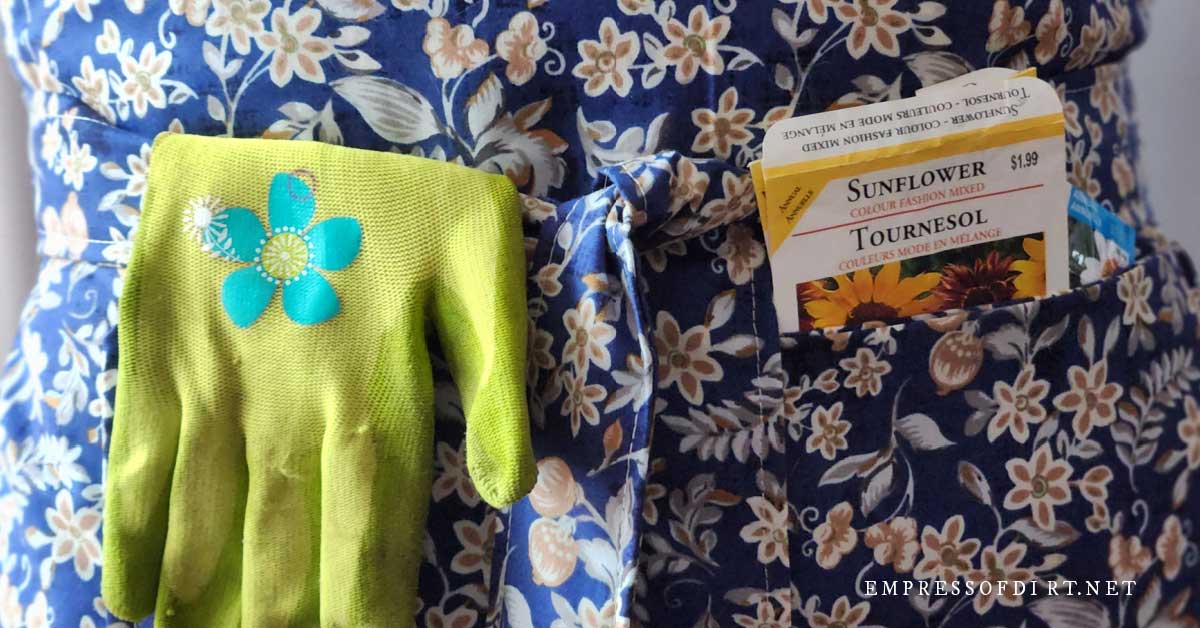
This comfortable garden apron is an easy sewing project, perfect for beginners. It requires minimal fabric, can be sewn in an afternoon, and includes a free pattern.
For those who love simple sewing projects, this gardening head scarf is another hot summer favorite.
sew a garden apron

This basic apron pattern can be used to sew the perfect apron for gardening, indoor seeding, housework, and more.
If your apron is for outdoor work where it might get muddy or wet, choose a durable fabric such as denim or canvas, or an outdoor curtain or upholstery fabric with some water resistance.
For other tasks, crisp cotton fabrics (single or double ply) are suitable.
One of my favorite aprons is made from a lined tablecloth (like the ones sold at dollar stores). Effective for protecting clothes when painting or staining in DIY projects.
About the design of this apron
size
Although this apron is designed to fit a wide range of sizes, we always recommend checking the measurements to ensure it fits your needs.
design

This apron has a classic design with the bib and skirt made from one piece of fabric.
There are two sets of ties for the neck and waist.
The waist strap is quite long and is the type that wraps around the body and ties in the front. If you want your tie to be shorter, you can always adjust it.
The pockets are made of double-thickness fabric fixed to the front of the skirt.
Once you’ve made your apron for the first time, we recommend adding additional features such as clips, snaps, buttons for ties, belt loops, a zippered pocket for your phone, and your favorite embellishments such as embroidery or patchwork.
Instructions
material
1.5 yards (54 inches long) of fabric (44 inches wide) of thread
supplies
Sewing machine and needle (as appropriate for your fabric) Cutting mat Rotary cutter Ruler Scissors Pins or clips Tailor’s chalk or burnishing Fabric pen Masking tape and marking pen Iron and ironing mat Free pattern – Apron Bib Template – See Resources
1cut the fabric

fold the fabric
Fold the fabric lengthwise and press the wrong sides together.
draw a cut line
Mark your cut lines using tailor chalk or a burnishing fabric pen.
Apron (folded): 34 inches long x 14 inches wide. Waist tie: 54″ long x 7″ wide (approximately) (fabric folded = 2 pieces). (2) Ties (folded): 14″ wide x 2″ long (28″ wide unfolded). Pocket (folded): 14″ wide x 8″ long (= 16″ unfolded).
cut the fabric
Cut out the fabric pieces using a rotary cutter and mat or fabric scissors.
Cut two waist ties, 54 x 7 inches. With the fabric folded, you only need to cut it once. Also, cut out the ears and make sure the two waist tie pieces are the same width and length. Cut the apron to 34 x 14 inches wide (at the fold). Actual product size will be 34 x 28 inches. Cut ties (2): 14 x 2 inches. Each tie piece measures 28 x 2 inches. Cut pocket: 14 x 8 inches long. Actual item size will be 28 x 8 inches.
2label the pieces of cloth

Label each dough piece. I used painter’s tape and sharpie markers.
3cut apron bib curve

fabric
To make the apron bib, fold a piece of apron fabric (34 x 14) on the right side with a crease on the right side.
cut the curve
Print the free pattern (see Resources) or freehand create a curve based on the measurements above.
The pattern is a PDF file and consists of five 8.5 x 11 inch sheets of paper taped together.
The top of the bib must be 5 inches wide (crease = 10 inches).
The bottom of the bib is 13 inches below the top of the bib.
We’re just cutting the curve here, nothing else.
This is what it looks like after cutting.

The piece of cloth with the blue APRON label (top) is not needed and can be set aside.
4make a tie

The easiest way to make a tie is the double fold method. This will hide the raw edges.
First, take two pieces of fabric that are 28 inches long and 2 inches wide to make two ties.
Fold each tie piece in half lengthwise (wrong sides together), right side down, and press into place. This center crease will be your guide.
Photo (above):
Fold the dough lengthwise (both sides together) and press, then also fold the edges inward (0.5 inch) and press into place. Then fold each long edge (0.5 inch) and press into the center. The tie is now 1 inch wide with one step left. Fold in half again and press into place.

Topstitch the tie close near the end as shown in the photo. Use the zipper foot for this.
5make a waist tie
I mentioned at the beginning that the waist cord is something that is wrapped around the body and tied in front. I do it this way because it’s very comfortable.
You may want to make it shorter. If so, you can adjust the size now or later.
To make the waist tie, start with two pieces of fabric, each approximately 54 x 7 inches. Cut the ears if you haven’t already done so.
The waist tie is made in the same way as the neck tie, but it is larger.
Fold each tie in half lengthwise, right side down, and press (wrong sides together) to form a center crease.
Fold the edges and press in about 0.5 inch each.
Fold each long edge, press and fold along the center crease, and fold again.
The tie is now 4 layers thick and about 1 3/4 inches (1.75 inches) wide.

Topstitch about 1/4 inch from the edge as shown in the photo above.
6Hem Apron Bib Curve & Top

The hem around the bib uses 1 inch of fabric, 0.5 inch at the first fold and 0.5 inch at the second fold.
Place the apron fabric inside out as shown in the picture above.
(0.5 inch) and press each of the two curved edges.
Then, using small scissors, cut the folded fabric every inch or so, being careful to keep it 1/8 inch away from the fold line (see photo below). This will make the hem nice and flat.

Then fold (another 0.5 inch), press, and pin (or clip) the hem in place.
Sew these hems in place with a topstitch (right side of the fabric) about 1/4 inch from the edge.
7Hem apron skirt side & bottom

Once you have finished hemming the curve, hem the sides of the skirt.
Again, with the apron fabric right side down, fold and press the hem half an inch, and do the same again to hide the raw edges.
Secure everything in place with pins (or clips) and topstitch the right side of the fabric using a straight stitch 1/4 inch from the edge.
Then, with the wrong side up, fold each corner (see image below) and press into place before making the hem. This will make the hem more beautiful.

The hem is made of 2 inch (1 inch plus 1 inch) fabric folded double.
With the apron fabric right side down, fold the hem 1 inch (back sides together), tuck, and fold again (1 inch). Press and secure with pins (or clips).

Using the right side of the fabric, topstitch the hem of the apron in a straight line about 3/4 inch from the bottom. Press it into place.
Alternatively, you can hem the seams by hand.
The entire apron is now hemmed.
8make a pocket

Cut the pocket fabric along the crease as in step 1. Open it up and place the right side along the 8-inch crease on the right side.
The outer pocket has two layers of thickness to make it durable.
See the diagram (above) for these steps.
Sew a 0.5-inch seam all the way around, except for the area shown in Photo 1 (above). Trim each corner close to but not touching the stitches. Turn the dough over and press. The long edge with the unstitched gap will be the bottom edge of the pocket.
8attach a pocket

Please ignore the string in the photo (above). It is best to sew it last, after installing the pocket, so that it does not get in the way.
To place the pockets, turn the apron fabric right side out, locate the waist of the apron, and mark the center point.
Also mark the center point of the pocket.
Pin the pocket to the apron skirt so that the top edge of the pocket is about 2 inches below the waistline and in the center of the skirt.
Topstitch the pocket along three sides of the apron as shown in the photo (above). Reinforce the stitches at both ends and corners (by backstitching).
Next, topstitch down the center to divide the pocket into two.
9put on a tie

sew the tie onto the bib
With the bib fabric right side up, place the tie behind the top corner of the bib, overlapping by about 1 inch. Pin in place.
Topstitch in place. I like to stitch rectangles with an X inside.
Repeat the same steps for the second tie.
Next, we will attach the waist strap.

sew the waistband to the skirt
With the apron fabric right side up, place the waist tie at the back of the skirt (just below the side bib), overlapping by about 1 3/4 inches (1.75 inches). The waist tie should be only 1/8 inch below the corner.
Topstitch the waist tie in place. Stitch a rectangle with an X on the inside to make sure the waist tie is secure.
Repeat for the second waist tie.
adjustment
Try on the apron and adjust the waist ties if necessary. If it’s too long, clip the ends, tuck the raw edges, and topstitch in place.
completed apron
Here is the completed apron.

Again, I really like the wraparound waist tie, but to each their own.

Once created, change the design to your liking.
I like to have an apron handy wherever I work, whether it’s at home or in the garden, to protect my clothes and get on with the task at hand.
resource
Epress of Dirt
apron bib template

Enter your email and save the file.
Joining our free newsletter list is an option at checkout.
Sewing Machine | Sewing Machine For this project, I used the Singer Quantum Stylist 9960.
~Melissa Empress of Dirt ♛