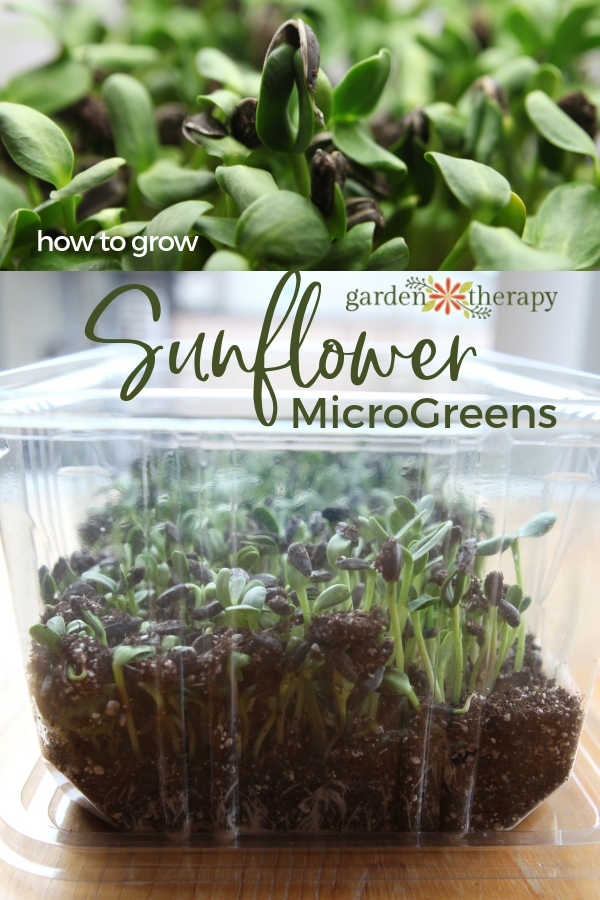
Sunflower microgreens have the texture of spinach and the delicious nutty flavor of raw sunflower seeds. Not only are sunflower seeds easy to germinate, they can be harvested and eaten within two weeks.
In my opinion, sunflower microgreens are one of the most underrated sprouts. If I had my way, every household would always have a container of sunflower buds on the counter.
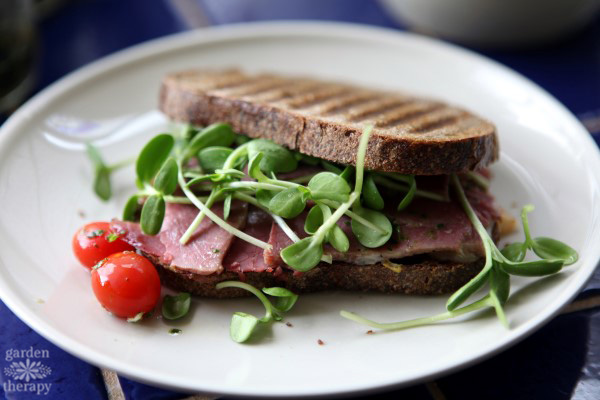
This new bud is small but mighty. Add flavor and texture to salads, soups, sandwiches, and dips while packing a nutritious punch. Can you tell I love sunflower microgreens?
Sprouts and microgreens are one of my favorite ways to enjoy freshly prepared food year-round. It’s a staple on my countertop during the winter months.
In this post, I’ll share detailed instructions on how to grow delicious and tasty sunflower microgreens that are healthy (and more importantly) safe to eat.
So what are we waiting for? We will show you how to grow sunflower microgreens.

Materials needed to grow sunflower microgreens
These delicious vegetables are easy to grow in just about any container you have around the house, including clear plastic salad mix boxes. We’ll discuss these consumables in more detail, but here’s a quick snapshot.

How to make a greenhouse for microgreens
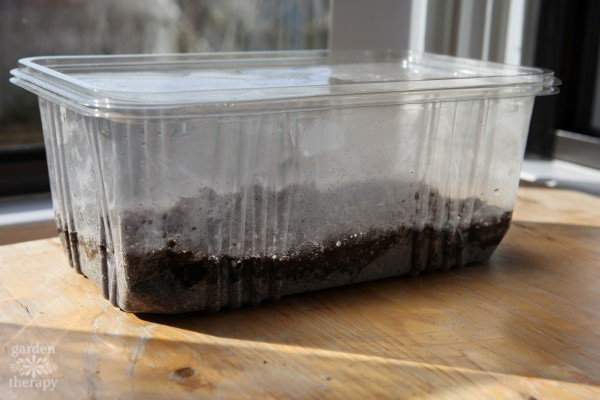
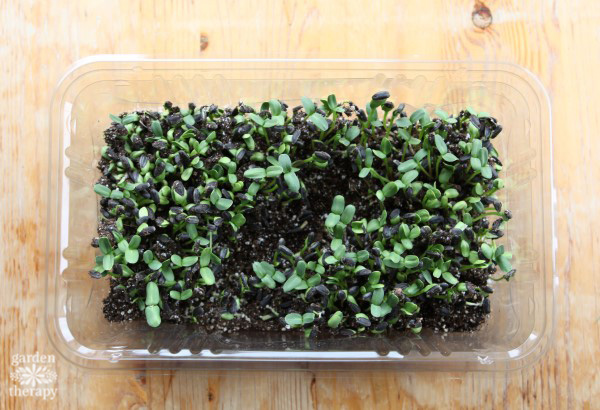
You don’t need fancy equipment to create a growing environment for this highbrow salad trimming. I used biodegradable plastic salad boxes that are perfect for soil trays and greenhouses. Check the plastic number here to ensure it is food safe before growing.
You can also grow sunflower microgreens in anything that can create a mini greenhouse, such as a milk jug cut in half, a cake tray, or a chicken dome.
Of course, you can also use a dome specifically designed for growing microgreens like this one. The advantage of commercially available domes is that they fit standard seedling trays and have vents that allow you to control humidity.
Use the best sunflower seeds possible
The better the seeds, the better the sprouts. Use organic black oil sunflower seeds specially labeled for germination or grow your own. Many people like to use what is packaged as bird seed, but we strongly advise against using it, as it is not regulated for human consumption.
I always buy germinated seeds from reputable sources that are meant to be germinated to ensure safety. I like to buy from West Coast Seeds.
You can also use raw striped sunflower seeds sold as snack foods (as long as they are not roasted or salted and the shells are still intact). I’ve used it before and it works great. Black oil sunflower seeds have a little more flavor, so if you like the striped ones, try something else sometime.

The best soil for growing sunflower microgreens
You don’t need much, but choose your soil carefully. I use a sterile seedling mix (like the blend in this post) that is light and clean. Why use garden soil?
First of all, earth gnats! Oh, those annoying little flies that you can’t catch no matter how hard you try should be reason enough, but that’s not all. Second, while the microorganisms, bacteria, fungi, and other good ingredients found in garden soil may be valuable for outdoor cultivation, these tiny seeds are great without any additional soil nutrients. Contains everything you need to grow crunchy microgreens. Additionally, some of the ingredients in the soil may not be compatible with the sprouts, causing mold to grow and kill them before they can be added to your salad. Third, you need soil that stays moist but not soggy. Seedling mixtures are made only for this purpose.
Since this growing project requires so little soil, you may be wondering what to do with the rest of the bag. My first suggestion is to grow more plants. 🙂
That being said, you can transfer the soil to a large plastic tub with a lid and store it in a cool, dry place. This will keep the soil sterile and eliminate the nuisance of soil gnats that can occur when the soil is wet.
Differences between germination and growth of microgreens
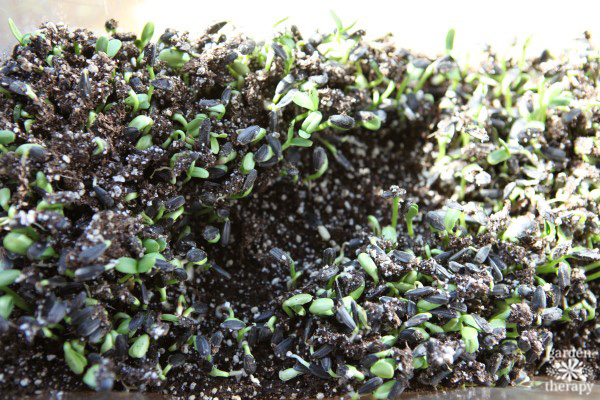
Some people ask if they can grow sunflower microgreens without soil. The difference between germinating and growing microgreens is whether you use soil or not. No soil is required during germination. Microgreens, on the other hand, require soil.
I’ve done both, but I prefer sunflowers as a microgreen. You get more vegetables and they last longer. Can you see how the sunflower pushes through the soil?
It helps to remove the shell from the seeds. This burst of energy also affects flavor. The same goes for mung beans, to get the best flavor you have to put weights in the sprouter and move the mung beans around. But without further ado (read more about germination here).

How to plant sunflower microgreens
As you can see, growing sunflower microgreens is very easy.
First, add about 1 inch of clean indoor soil to the bottom tray and spread the sunflower seeds on top. Cover the seeds with plenty of soil so they don’t overlap.
Cover the seeds with enough soil to retain moisture and place the mini-greenhouse in a warm location out of direct sunlight.
How to water sunflower sprouts
Water the soil and keep it moist but not soggy. While sunflower seeds are cracking, it is necessary to maintain some humidity, but remove the lid several times every day to refresh the air inside.
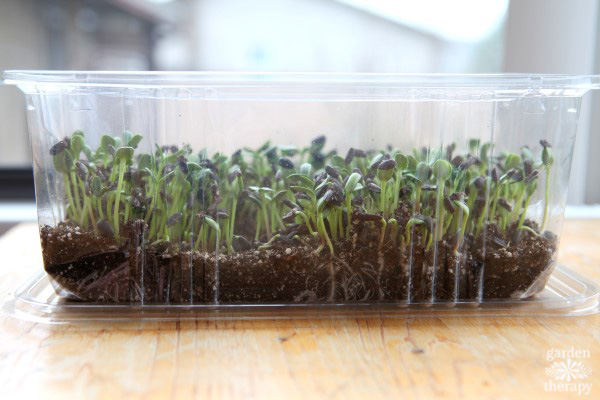
Once the seedlings begin to grow, remove the lid completely and enjoy the fresh air. Water only until the soil is moist. Be careful not to overwater as this may cause rot and mold growth.
How to harvest sunflower microgreens
Sunflower microgreens are ready for harvest when the giant seedlings push up the soil and lose their shells. There should be two thick seed leaves as shown in the photo.
If not all the shells come off, scrape the tops of the seedlings to remove them when harvesting. If not, use a salad spinner to remove the shells when washing the microgreens.
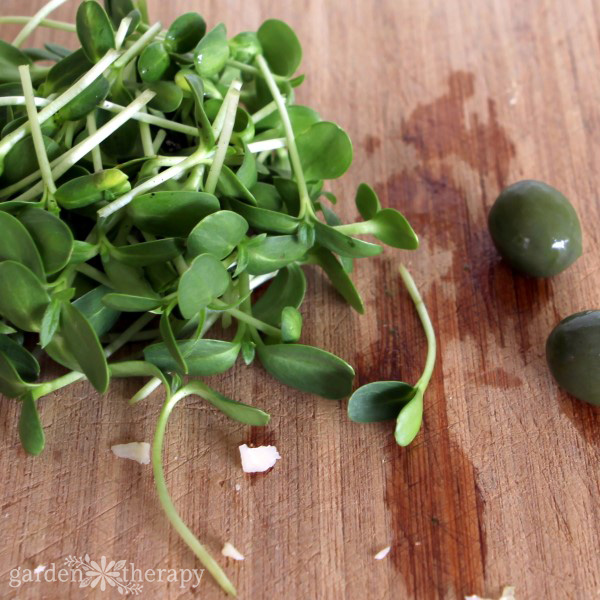
Cut off the base of the seedlings and wash them in a small salad spinner (I use this one). I usually store them in a salad spinner after harvesting and wash them every few days.
I dry it and store it in a salad spinner in the fridge. This is because keeping them in a colander allows for good drainage and prevents rot and mold.
Once you’ve harvested your microgreens, compost the soil and roots so they don’t regrow. To make a new batch, use the clean seedling mixture and start again.
There may have been contaminants that got into the soil from the first batch, as well as roots that decomposed in the soil, potentially spoiling the new batch.
For more ideas, check out photos of sunflower sprout growth over 17 days: Sunflower Micro Greens: A Time Lapse Photo Journal.
Frequently asked questions about sunflower microgreens
In my case, it takes about 2 weeks to grow. In this post you can see a time-lapse of my countertop microgreens.
Sunflower seeds are grown to germinate and be eaten, so it’s best to buy them from a reputable source. Ideally, you’ll want to use black oil sunflower seeds that are specifically labeled for germination. I purchase from West Coast Seeds. You can eat the whole microgreens, stems, and leaves.
They are very healthy for you. Contains vitamins A, B, D, and E, as well as calcium, iron, magnesium, potassium, and phosphorus. Despite being a small green, it is packed with nutrients.
Winter gardening in a smaller space